Fetch GSTR 2A & 2B Data in Purchase from GST Portal
Quickly fetch Purchase GST data from the GST portal using Vyapar TaxOne’s “Get GST Data” feature. Read the article for steps and a complete user guide.
Fetch GSTR 2A & 2B Data in Purchase from GST Portal
Fetch your Purchase GST data directly from the GST portal using Vyapar TaxOne's "Fetch GSTR2A/2B" feature. Read the article for steps and a complete user guide.
Accessing GST Data in Purchase
In Purchase, accessing GST (Goods and Services Tax) data has never been easier. With the "Fetch GSTR2A/2B" button, users can now seamlessly retrieve their GST data directly from the GST portal. TaxOne now supports both GSTR 2A and GSTR 2B data fetching.
What's New:
- GSTR 2A support added alongside existing GSTR 2B
- Tax rate visibility - see GST rates (5%, 12%, 18%, 28%) directly in the transaction listing
- Duplicate detection - transactions already in Tally are automatically disabled
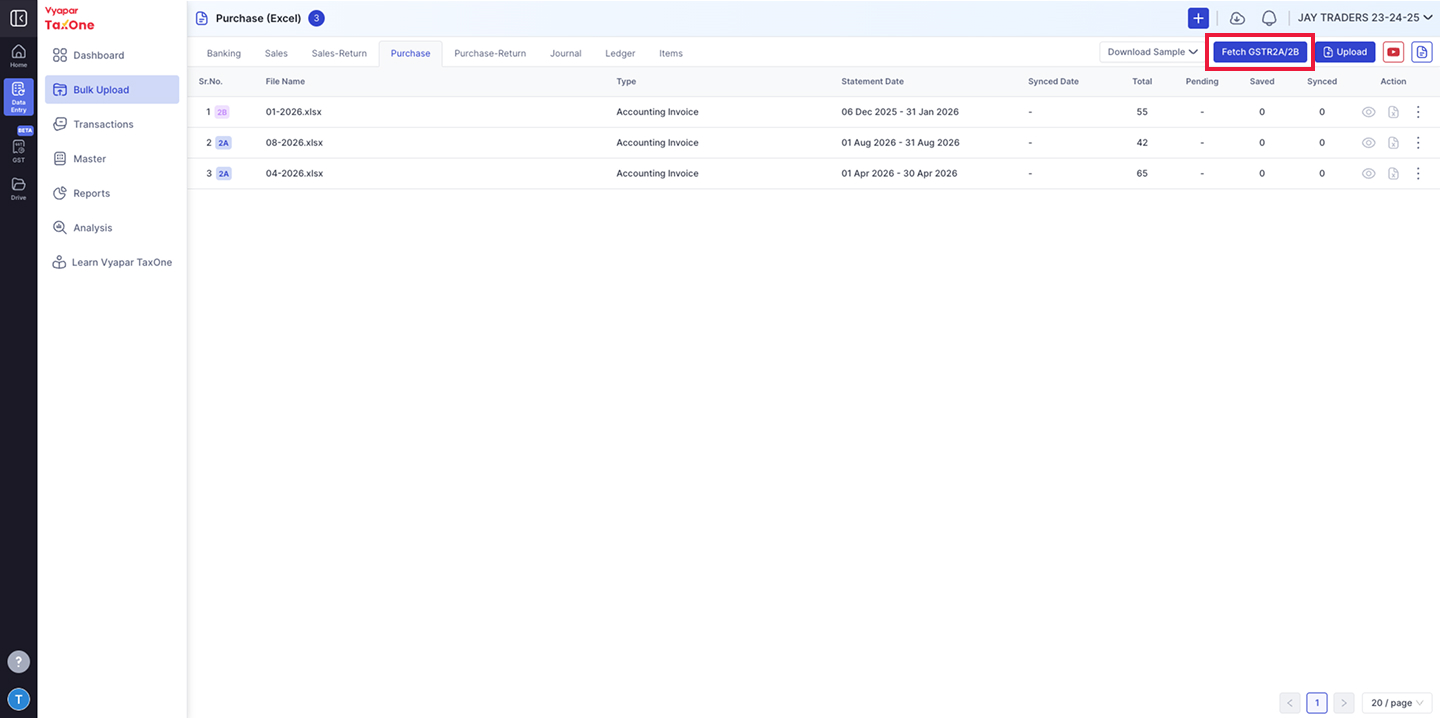
- Click on Data Entry Automation - Bulk Upload - Purchase - "Fetch GSTR2A/2B"
Step 2: Select Return Type
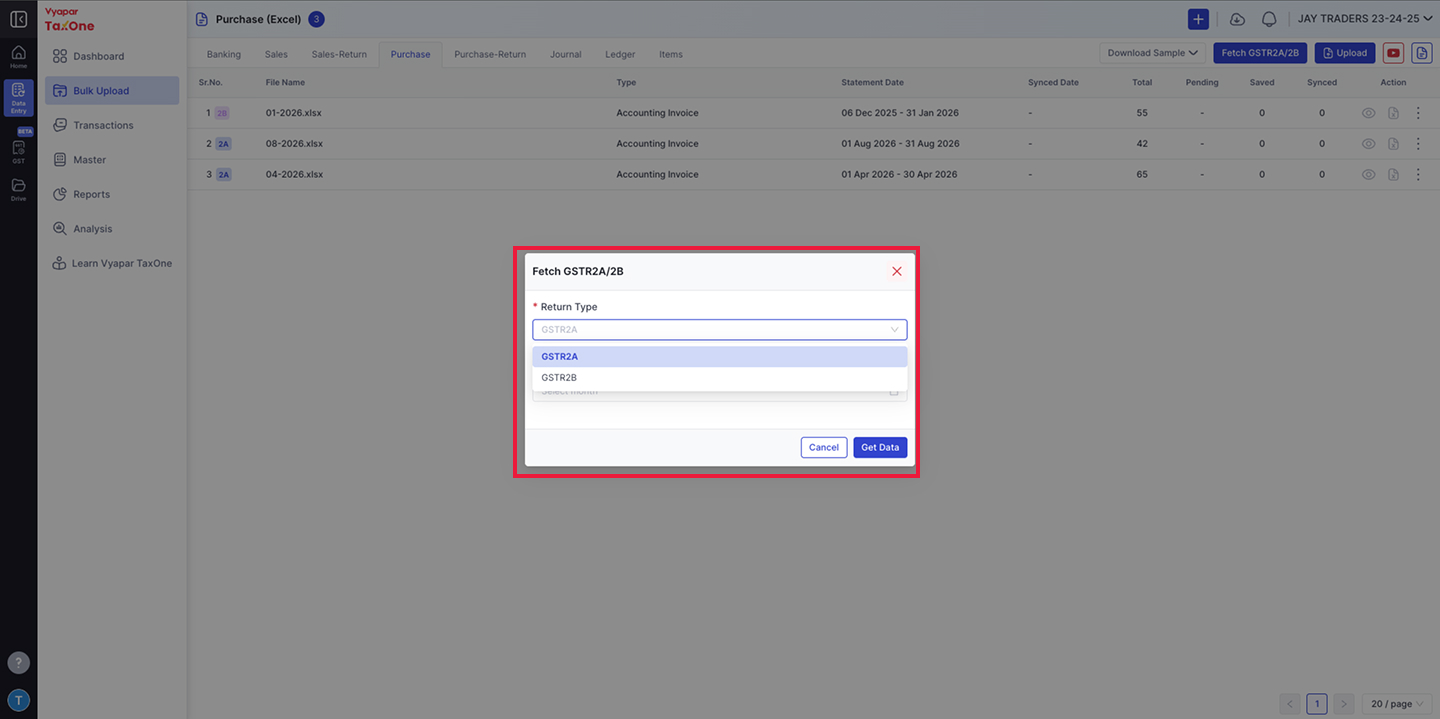
- Upon clicking the button, a popup window titled "Fetch GSTR2A/2B" will appear.
- Select the Return Type from the dropdown:
- GSTR2A - Dynamic return; updated throughout the month as suppliers file their GSTR-1.
- GSTR2B - Static statement; generated on the 14th of every month. Used for ITC claims.
Step 3: Selecting the Filing Period
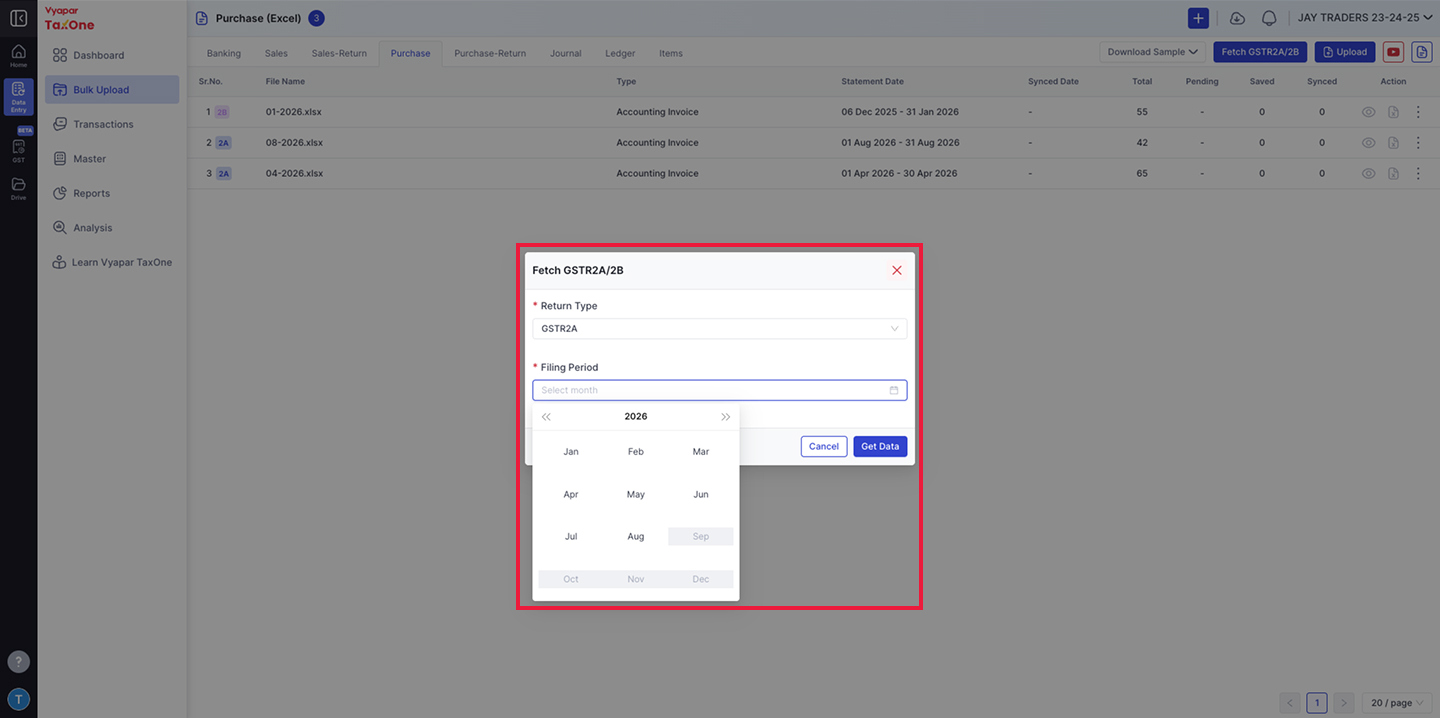
- To specify the desired period for GST data retrieval, click on the "Filing Period" field.
- A month picker will appear. Select the month and year for which you want to fetch data.
- Use the left/right arrows to navigate between years.
Step 4: Enter GST Number and User Name
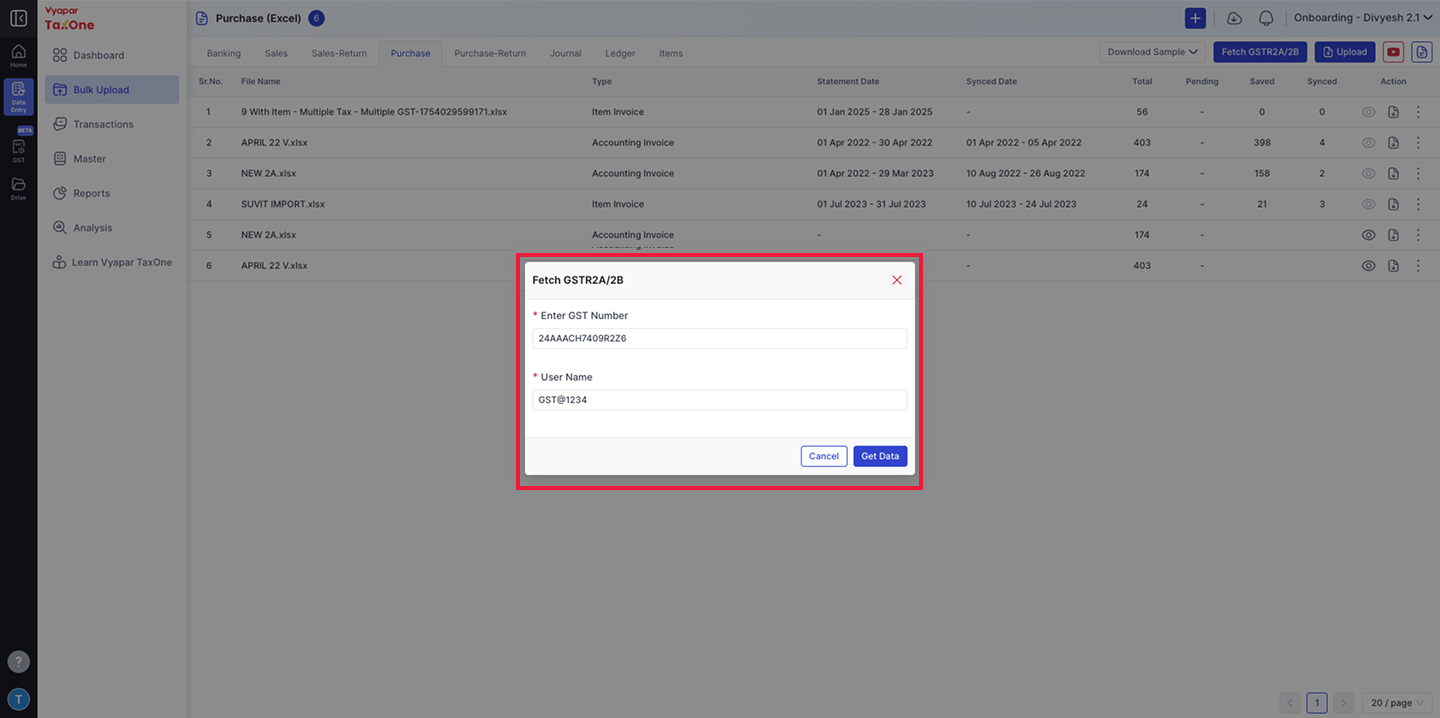
- Enter the GST Number (e.g., 24AAACH7409R2Z6).
- Enter the User Name - this is a unique ID allotted to each GSTIN by the GST Portal (e.g., GST@1234).
- Once you enter the required information, click "Get Data".
💡 Note: The GST Portal User Name is not the same as your Vyapar TaxOne login. Every GST number has a unique username assigned by the GST Portal. If you've fetched data before, these fields will be auto-filled.
Step 5: OTP Verification
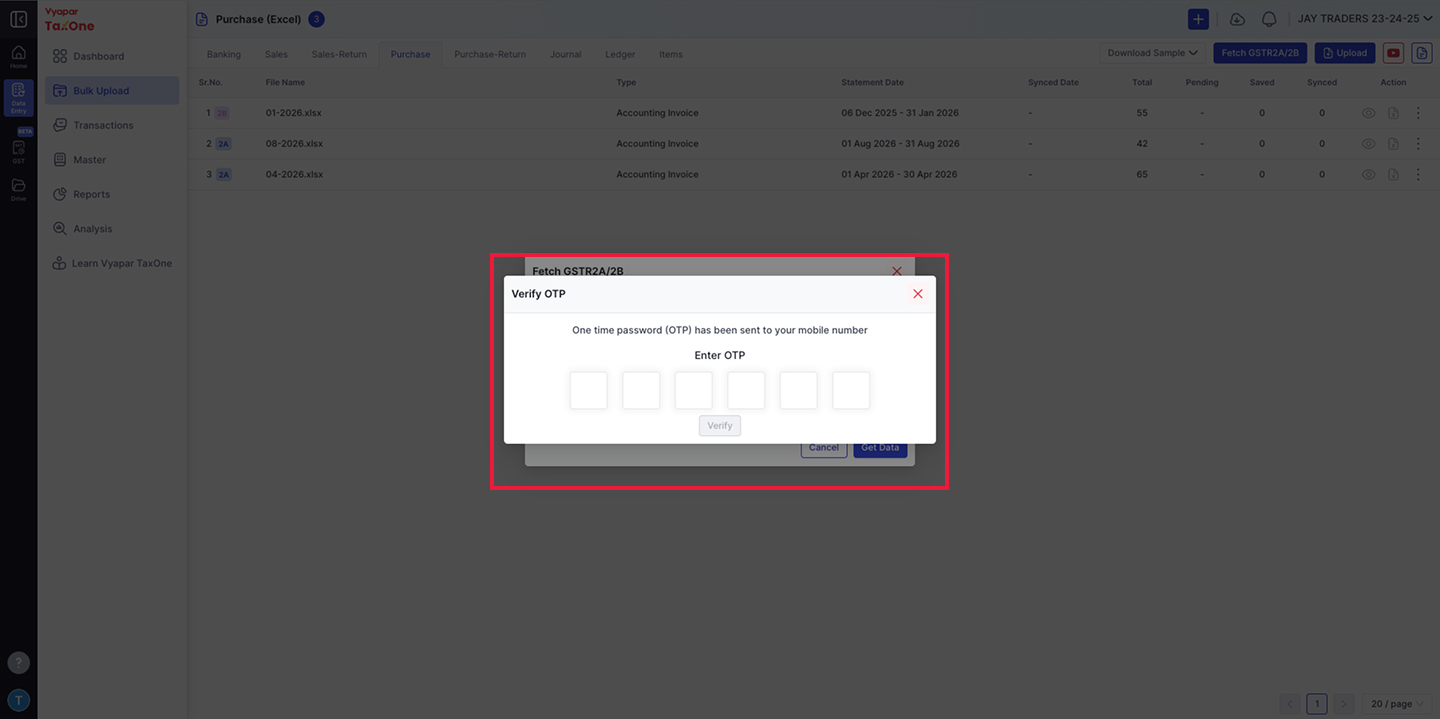
- You will be asked to enter the OTP.
- A "Verify OTP" popup will appear with the message: "One time password (OTP) has been sent to your mobile number".
- Enter the 6-digit OTP sent to the registered mobile number linked to that GST number.
- Click "Verify" to proceed.
💡 Note: The OTP session is valid for 6 hours. During this window, you can fetch data multiple times without requesting a new OTP.
Step 6: Viewing Fetched Data
- Once the data has been successfully fetched, the platform will present the retrieved files as a listing page. Users can navigate and view the fetched data within this interface.
- Each transaction displays: Supplier Name, Invoice Number, Invoice Date, Taxable Value, and Tax Rate.
- Files in the Purchase listing will show a 2A or 2B badge next to the file name.
- If a transaction already exists in Tally, it will be disabled (greyed out) to prevent duplicate entries.
Step 7: Saving and Sending
After data retrieval, users can perform various actions on the fetched GST data:
- Saving: Save the mapped data to preserve it for future reference or reporting.
- Sending: If required, users can send the data to designated recipients or push it to Tally by assigning the correct ledgers:
- Intrastate (same state): Select CGST and SGST ledger accounts.
- Interstate (different states): Select the IGST ledger account.
👋 You May Find This Useful:
- Learn how to upload Purchase/Purchase Return data through an Excel sheet Learn more.
- Learn how to push Purchase data to Tally Learn more.
- Learn how to create a ledger and stock item from the purchase screen Learn more.
- Learn how to download GSTR-1 report in JSON/Excel Learn more.
